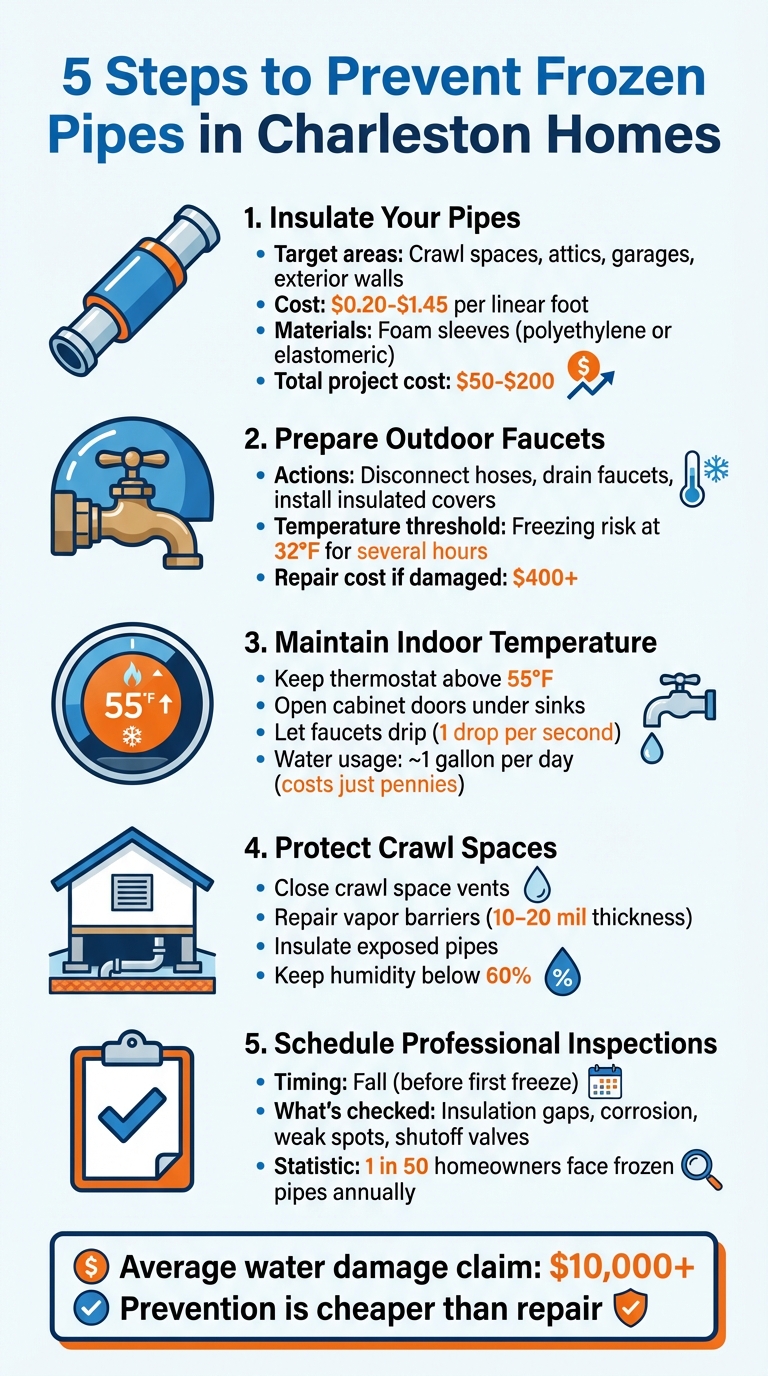
Charleston’s mild winters can still lead to frozen pipes during sudden cold snaps, causing costly repairs and water damage. Here’s how to protect your home:
- Insulate Pipes: Focus on crawl spaces, attics, garages, and exterior walls. Use foam sleeves or elastomeric foam for humid climates. Costs range from $0.20 to $1.45 per foot.
- Seal Drafts: Close gaps with caulk or spray foam where cold air can enter.
- Outdoor Fixtures: Disconnect hoses, drain faucets, and use insulated covers to prevent freezing.
- Maintain Heat: Keep your thermostat above 55°F, open cabinet doors, and let faucets drip during freezes.
- Crawl Space Protection: Close vents, repair vapor barriers, and insulate exposed pipes.
- Professional Inspections: Schedule fall inspections to catch hidden vulnerabilities.
Taking these steps now can save you thousands of dollars in repairs later. Don’t wait for the next freeze to act!
5-Step Guide to Prevent Frozen Pipes in Charleston Homes
Step 1: Insulate Your Pipes
Charleston homes are no strangers to unexpected cold snaps, and uninsulated pipes are especially vulnerable during these chilly spells. Pipes in crawl spaces, attics, garages, and along exterior walls are most at risk. Insulating them can cost between $50 and $200, but it’s a small price compared to the thousands you might spend on repairs if they freeze and burst.
Apply Foam Sleeves and Insulating Wraps
Start by identifying pipes located in unheated areas. For cold water lines, polyethylene foam sleeves are an affordable and effective choice, costing around $0.20 to $1.35 per linear foot. These sleeves are easy to install – just cut them to size, slide them over the pipes, and secure them with insulating tape, especially around bends, joints, and valves.
In humid climates like Charleston’s, flexible elastomeric foam is a better option. This material resists water vapor, which helps prevent condensation and rust. As Benjamin Franklin Plumbing explains:
"In high humidity places, flexible elastomeric foams are a top pick because they resist water vapor. This stops surface condensation, reducing rust risk."
This type of insulation typically costs $0.90 to $1.45 per linear foot.
For areas prone to severe freezes, consider adding UL-listed heat cables beneath the insulation for extra protection. With a combination of foam insulation and heat cables, your pipes will have a strong defense against freezing temperatures.
Seal Gaps and Drafts Around Pipes
Once your pipes are insulated, don’t forget to address any gaps or drafts that could let cold air sneak in. Pay close attention to areas where pipes pass through foundations, exterior walls, or near cable and gas vents. Use caulk or spray foam to seal smaller gaps, and for larger openings, weather stripping can do the trick.
Be sure to inspect foundation vents, crawl space openings, and any spots where pipes penetrate walls. However, in Charleston’s warm-humid climate (Zone 3-a), use spray foam cautiously. If leaks occur, it could trap moisture against wood, potentially causing rot.
sbb-itb-998eb83
Step 2: Prepare Outdoor Faucets and Hoses
While indoor pipes need insulation, outdoor fixtures require a different approach due to their direct exposure to the elements.
Outdoor fixtures are especially vulnerable to freezing since they’re fully exposed to cold weather. In Charleston, pipes can freeze when temperatures linger at 32°F or below for several hours. During winter cold snaps, Lowcountry temperatures can drop into the mid-20s. The real danger often comes during the thaw, when pressurized water escapes through cracks, potentially flooding walls or subfloors.
Disconnect and Drain Garden Hoses
Protecting outdoor fixtures is essential to avoid expensive water damage inside your home.
Start by disconnecting garden hoses before the first hard freeze. Leaving a hose attached can trap water inside the faucet pipe. When that water freezes and expands, it can cause the pipe to burst inside your wall. Once disconnected, drain the hose on a sloped surface to remove any remaining water before storing it.
If your home has interior shut-off valves for outdoor faucets, turn these off. Then, open the outdoor spigot to drain any water left in the line. Mike Saia, Public Information Administrator with the Charleston Water System, advises:
If you have a spigot, make sure your hose is disconnected, and you cover it up.
Also, don’t forget to disconnect, cover, and insulate irrigation system backflow preventers since they’re prone to bursting.
Install Insulated Faucet Covers
Insulated faucet covers (also called bib covers) are an easy way to add a thermal barrier against freezing temperatures. These are available locally and are simple to install, but the key is ensuring a tight fit against the house wall. Any gaps can let cold air in, reducing the cover’s effectiveness. Before installation, drain the faucet completely and check for leaks or damage.
For drawstring-style covers, thread the cords under the open end, position the cover over the faucet, tighten the drawstring, and secure the lock. If insulated covers aren’t available, you can wrap outdoor fixtures with towels, blankets, or foam insulation. Taking this step can save you from costly repairs, which typically start at $400 or more.
Step 3: Maintain Indoor Temperatures and Water Flow
After securing outdoor fixtures, it’s time to focus on keeping your home warm and ensuring water flows through your pipes to prevent freezing.
In southern states like South Carolina, pipes are especially prone to freezing when temperatures hit 28°F or lower. Homes in these areas are even more at risk at 20°F, as pipes are often located in less insulated parts of the house. Here’s how to protect your indoor plumbing with a few key adjustments.
Keep Your Thermostat Above 55°F
Always keep your thermostat set to at least 55°F. This temperature threshold helps maintain warmth in areas like wall cavities and cabinets, where pipes are more vulnerable to freezing.
Kay Plumbing Heating And Cooling reinforces this point:
"Ideally, you should keep your home’s temperature above 55 degrees to prevent freezing pipes."
It’s worth noting that the average cost of a water damage and freezing claim exceeds $10,000 per incident. A small adjustment to your thermostat could save you from a hefty repair bill.
Open Cabinet Doors and Let Faucets Drip
Beyond adjusting your thermostat, promoting air circulation around your pipes is another effective strategy.
By opening cabinet doors under sinks in kitchens and bathrooms, you allow warm air to flow around the plumbing. This is particularly important for pipes located in cabinets along exterior walls, which are more exposed to cold air.
During severe cold snaps, let your faucets drip at about one drop per second. Flowing water is much less likely to freeze, and an open faucet relieves pressure that could otherwise cause pipes to burst. For single-handle faucets, set the handle in the middle so water moves through both hot and cold lines. For dual-handle faucets, slightly open both sides.
Mike Saia, Public Information Administrator for the Charleston Water System, highlights the importance of this step:
"Dripping your faucet… is the single most effective thing to do. It’ll keep your water moving and prevent pipes from freezing."
These precautions work together to protect even the most at-risk pipes. Plus, dripping a faucet for an entire day only uses about one gallon of water, costing just a few cents. For two-story homes, the Charleston Water System advises running faucets on the first floor overnight during freezing conditions.
Step 4: Protect Crawl Spaces and Exposed Areas
Crawl spaces in Charleston homes are particularly susceptible to freezing because of exposed plumbing. Most plumbing lines are located in these unheated areas, making them especially vulnerable when temperatures drop. Properly sealing these spaces not only helps protect pipes but also keeps your home warmer overall.
Seal Crawl Space Vents and Repair Vapor Barriers
When the weather turns colder, make sure to close crawl space vents to keep cold air from reaching your pipes. Hannah Lagaly from New Age Contractors emphasizes the importance of this step:
"Shut your crawlspace vents when it starts to get colder outside. This will prevent any cold air flow from entering into your crawl space where the majority of your plumbing lines are located."
In addition to sealing vents, inspect the vapor barrier in your crawl space. Overlap seams by at least 6 inches and secure them with waterproof seam tape. For Charleston’s humid environment, opt for a vapor barrier that’s at least 10 to 20-mil thick, as thinner options may not hold up well. A well-maintained vapor barrier prevents ground moisture from rising, which can lead to condensation on pipes and increase the risk of freezing. Also, seal any foundation cracks or gaps around wiring and plumbing using spray foam or caulk. Once these steps are complete, you can focus on insulating exposed pipes.
Insulate Pipes in Crawl Spaces
Wrap exposed pipes with foam sleeves or fiberglass insulation, giving special attention to areas near foundation vents, as they are more exposed to cold air. To add an extra layer of protection, place insulation behind the vents to shield pipes from sudden temperature drops. For extreme cold, consider using UL-listed heating tape or thermostat-controlled heating cables on pipes that are most at risk. Finally, monitor crawl space humidity with a hygrometer and keep levels below 60%. High humidity can lead to mold growth, which can start forming in just 48 hours under damp conditions.
Step 5: Schedule Regular Inspections with ALL Plumbing Services
Professional inspections can reveal hidden issues that might lead to costly emergencies. Even if you’ve taken all the right DIY precautions, there could still be vulnerabilities in your plumbing system. Experts not only spot these hidden problems but also strengthen the preventative steps you’ve already taken.
Why Professional Inspections Matter
Trained technicians are skilled at identifying things like insulation gaps, corrosion, and weak spots – areas that are easy to miss for the average homeowner. This is particularly important in Charleston, where South Carolina building codes may only require pipe insulation within 36 inches of the exterior. This leaves areas like attics, garages, and crawl spaces exposed and unprotected. Professional inspections also ensure that your main water shutoff valve is working properly, check irrigation systems, and prepare your water heater to handle the extra demand during winter. These checks work alongside your insulation and temperature management efforts to make sure no critical detail is overlooked.
The best time to schedule an inspection is in the fall, before the first hard freeze. Many technicians use tools like thermal imaging to find cold spots along pipes or video inspections to locate internal fractures that aren’t visible otherwise. Considering that about 1 in 50 homeowners will deal with a frozen pipe during winter, regular professional check-ups can significantly lower your chances of joining that statistic.
Maintenance Plans from ALL Plumbing Services
To make things even easier, ALL Plumbing Services offers maintenance plans tailored to keep your plumbing system in top shape for winter. The Basic Plan includes routine inspections to catch early signs of pipe stress. For more comprehensive coverage, the Advanced Plan offers system-wide checks, priority scheduling during emergency freezes, and discounts on repairs or insulation upgrades. These plans ensure your plumbing is ready to handle whatever winter throws at it.
Conclusion
Protecting your Charleston home from frozen pipes starts with preparation before the temperatures plunge. Simple steps like insulating pipes, securing outdoor fixtures, maintaining consistent indoor heat, shielding crawl spaces, and scheduling inspections can make all the difference.
"Most important thing for people to know is to take action now and start to prepare." – Mike Saia, Public Information Administrator, Charleston Water System
The stakes are high. Even a small pipe burst can lead to thousands of dollars in water damage repairs. On the other hand, preventative measures are far more affordable. It’s a straightforward equation: a little investment now can save you from major expenses later.
Charleston winters are unpredictable, and sudden overnight freezes are a common challenge in the Lowcountry. Compounding the issue, many homes in the area have plumbing systems designed for milder climates, leaving pipes in exterior walls and crawl spaces especially exposed. Waiting until a hard freeze is forecasted could leave you without enough time to properly winterize your system.
ALL Plumbing Services offers maintenance plans that include routine inspections, priority emergency scheduling, and expert support. Take action today to avoid costly repairs down the line.
FAQs
Which pipes freeze first in Charleston homes?
Pipes located in unheated spaces – such as basements, crawl spaces, attics, garages, or those running along exterior walls – are at the highest risk of freezing. This risk increases if the pipes lack adequate insulation or are exposed to cold drafts. Adding proper insulation and sealing off any gaps can go a long way in safeguarding these pipes during chilly weather.
What should I do if my pipes start to freeze?
If your pipes begin to freeze, it’s important to act fast to avoid a potential burst. Use safe heating methods like a hairdryer, heat lamp, or warm towels to gradually warm the pipe. Start near the faucet and work your way back along the pipe. Keep the faucet open to let water flow as the ice melts.
Never use open flames or extreme heat, as this can damage the pipes or create a fire hazard. If a pipe does burst or you’re unable to thaw it properly, call a professional plumber right away.
How do I find and shut off my main water valve fast?
To find your main water valve, start by checking typical locations such as the basement, utility room, garage, or near the front foundation wall. In warmer regions, it might be located outside.
Once located, determine the type of valve you have. If it’s a gate valve, turn it clockwise until it stops. If it’s a ball valve, rotate it 90 degrees until it’s perpendicular to the pipe. Make a habit of testing the valve periodically to ensure it operates smoothly when needed.
