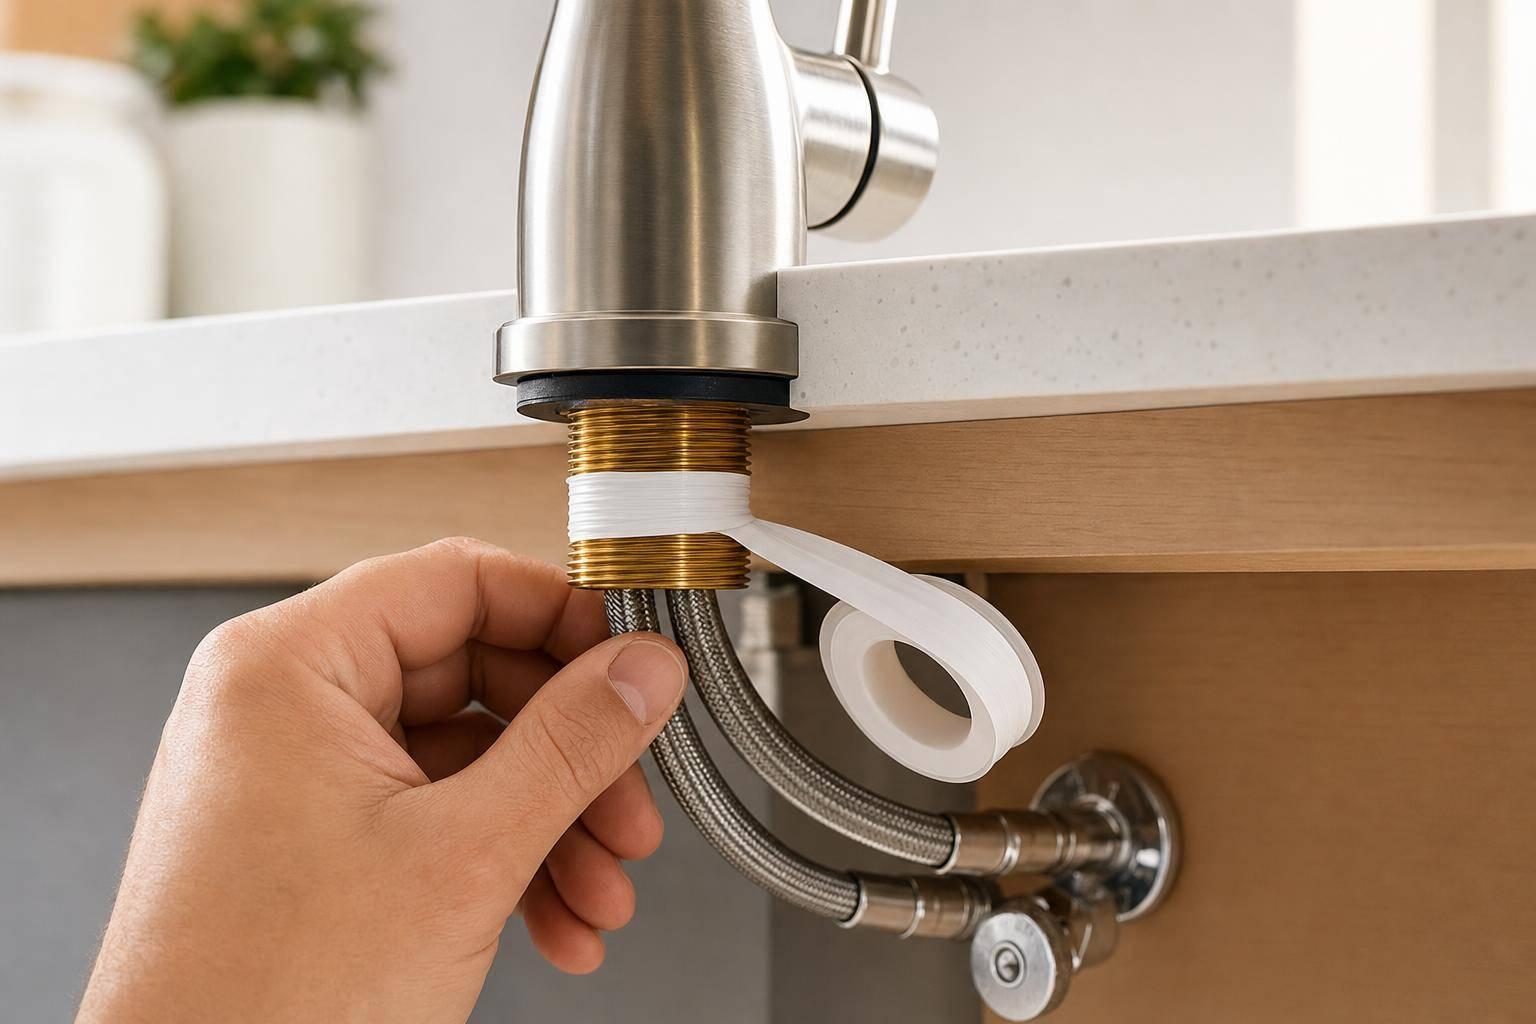
A small faucet install mistake can turn into cabinet damage, mold, or a water bill hit. Even a minor drip can waste 3,000+ gallons of water per year, so I treat a faucet swap like a leak-prevention job, not just a hardware change.
If I want to avoid problems, I focus on seven things:
- Pick a faucet that fits the sink holes, backsplash space, and under-sink area
- Shut off and test the water lines before loosening anything
- Use the gasket, sealant, and hardware the right way
- Avoid over-tightening or under-tightening nuts and connections
- Use plumber’s tape only where it belongs
- Flush the supply lines so debris doesn’t clog the new faucet
- Stop and call a plumber if valves are stuck, pipes are corroded, or the setup gets risky
A few simple checks up front help a lot: count the sink holes, measure clearance, inspect shutoff valves, and make sure the pull-down hose or counterweight has room to move. I’d also replace old supply lines if they look stiff, cracked, or corroded.
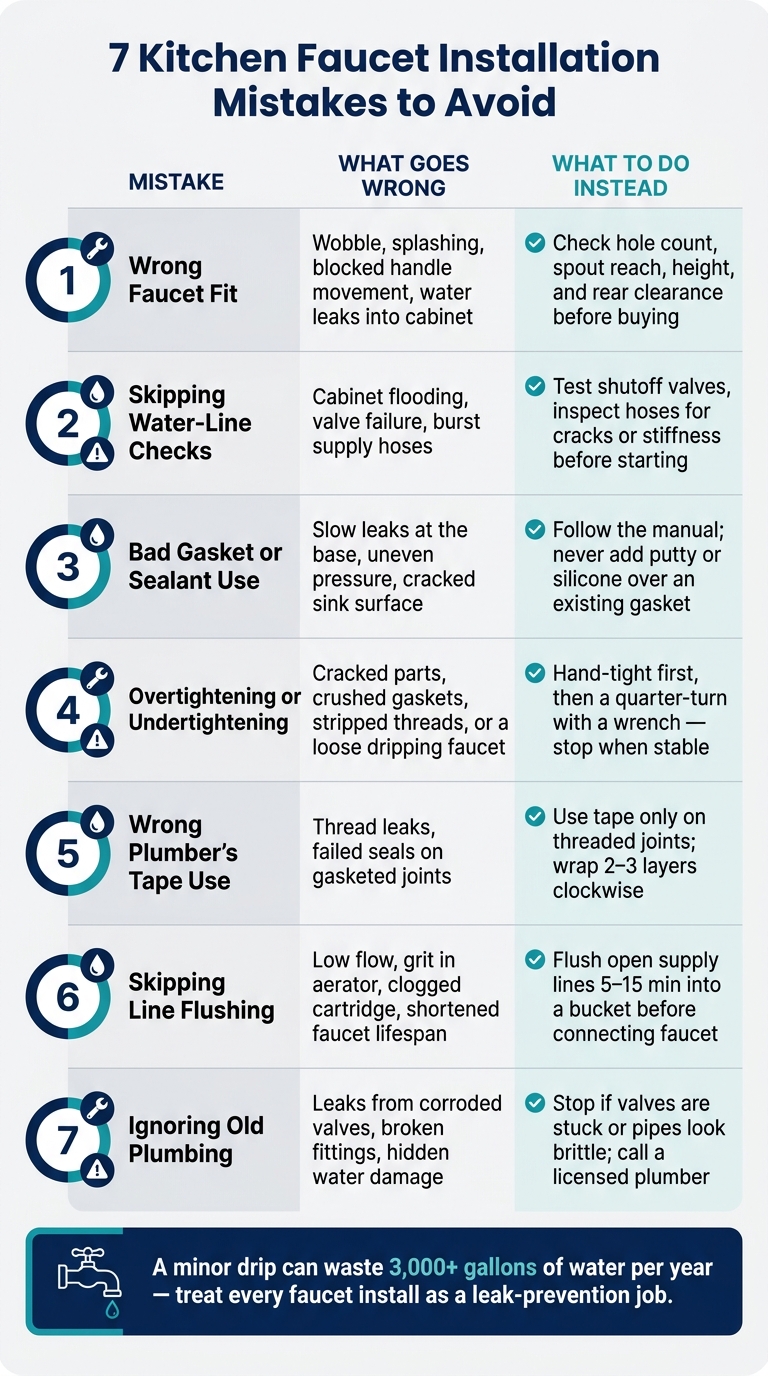
7 Kitchen Faucet Installation Mistakes: Causes, Risks & Fixes
Quick Comparison
| Mistake | What goes wrong | What I do instead |
|---|---|---|
| Wrong faucet fit | Wobble, splashing, blocked handle movement | Check hole count, reach, height, and clearance |
| Skipping water-line checks | Cabinet flooding or valve failure | Test shutoffs and inspect hoses first |
| Bad gasket or sealant use | Slow leaks at the base | Follow the manual and seal only if told to |
| Bad tightening | Cracked parts or loose faucet | Tighten just until secure |
| Wrong tape use | Thread leaks or bad seals | Use tape only on threaded joints that need it |
| No flushing | Low flow, grit, cartridge trouble | Flush lines and rinse the faucet before full use |
| Ignoring old plumbing | Leaks, broken valves, pipe damage | Stop if parts are rusted, stuck, or brittle |
This article comes down to one idea: most faucet problems start with fit, sealing, tightening, or skipped final checks.
Before You Start: What to Check Before Installing a Kitchen Faucet
Jumping into a faucet swap without a few basic checks can turn a simple job into a headache. A quick once-over now can help you avoid the most common install mistakes later.
Check Sink Holes, Faucet Style, and Clearance
First, count the mounting holes in your sink or countertop. Most sinks have 1 to 4 holes. If you’re moving to a single-hole faucet but your sink has 3 holes, you’ll need an escutcheon (deck) plate to cover the extra openings. If you’re working with a multi-hole sink, measure the center-to-center spread between the outer holes. Your new faucet needs to fit that spacing.
Then check the countertop thickness. Thick granite or stone can need longer mounting hardware. It also helps to check the space behind the faucet hole before you buy. If the backsplash sits too close, it can block the handle and make the faucet hard to use.
Inspect Shutoff Valves and Supply Line Connections
Before you do anything else, test the shutoff valves. Turn them fully clockwise, then open the faucet handles. If water still drips, deal with the valves first. In older coastal homes, worn parts and mineral buildup make this step even more important.
Take a look at the supply lines too. See whether they’re flexible or rigid, and check the connection size. 3/8-inch compression is the standard. If the new faucet comes with lines that don’t match, you’ll need adapters or new hoses. It’s also smart to replace old supply lines before the install.
Look for Under-Sink Obstacles and Added Components
Open the cabinet and look around before you commit. Garbage disposals, dishwasher drain lines, water filters, and even random stuff stored under the sink can get in the way. This matters even more with a pull-down faucet, because the counterweight needs a clear path to move up and down without snagging.
Read the Manual First
Read the manual before you start. Some faucets use an integrated gasket to seal, so adding putty or silicone in the wrong spot can lead to leaks.
"Follow the manual exactly; extra sealant can cause leaks." – Ana Matos, Author
Assembly steps, connection types, and hardware can change from one model to the next. Check the seal type and hardware needs before you put anything together. Those small details can save you from the seven mistakes that follow.
1. Choosing a Faucet That Doesn’t Match the Sink Layout or Clearance
Even if the basic measurements look fine, a faucet can still be the wrong fit. The body, spout reach, and mounting hardware all need to line up with the sink and the space around it.
Primary Installation Risk
When a faucet doesn’t match the sink or countertop, problems show up fast. The base may wobble, small gaps can appear, or the faucet may sit too close to the backsplash. That can lead to leaks, extra splashing, and a setup that’s annoying to use every day.
Common Fit Problems
Here are the fit problems people run into most often:
| Fit Issue | Warning Sign | Impact |
|---|---|---|
| Insufficient rear clearance | Handle hits the backsplash before reaching full hot position | Limited temperature control; finish damage |
| Incorrect spout reach | Spout misses the sink center | Excessive splashing; difficult rinsing |
| Unused holes left uncovered | Visible gaps in the sink deck | Water leaks into the cabinet |
| Hose blocked under the sink | Pull-down hose feels stuck or resists movement | Internal hose damage; limited sprayer range |
| Faucet too tall for the space | Spout interferes with cabinets or windows | Restricted or impossible movement |
"Installing the faucet without checking clearance can result in handles hitting the backsplash or pull-down hoses snagging on supply lines." – Haig Barsoumain, VP for Sales, Payless Kitchen Cabinets
Prevention Step
Measure the hole spread before you buy anything. Then do a test fit before you apply sealant or fully tighten the hardware. Make sure the handles can turn all the way, and check that the pull-down hose moves freely under the sink instead of catching on anything.
If your sink has extra holes, cover them with the deck plate that comes with the faucet.
When Professional Help Makes Sense
It helps to call a plumber if you’re working with:
- Thick stone countertops
- Wall-mount installs
- Corroded shutoff valves
If the faucet fits and mounts the way it should, the next thing to check is the water supply itself.
2. Not Turning Off or Checking the Water Supply Lines Properly
Primary Installation Risk
A faucet can be the right size and still go wrong fast if the shutoff valves or supply lines are in bad shape. This is where a simple faucet swap can turn into a soaked cabinet.
If you skip the shutoff step, or trust old valves without checking them, water can spill out the moment you loosen a connection. And supply lines are sneaky. Some look fine from the outside but are worn down inside. Move them during installation, and they can split or fail right after the new faucet goes in.
Typical Warning Signs
Check for these signs before you disconnect anything:
| Warning Sign | What It Means | What to Do |
|---|---|---|
| Green or white crust on connectors | Corrosion or slow leak | Replace the connector or valve |
| Stiff or rigid supply hoses | Brittle material, risk of cracking | Swap for new flexible braided lines |
| Moisture at the valve | Seal failure | Replace the shutoff valve |
| Water still drips after valves are closed | Internal valve failure | Do not proceed; call a plumber |
Prevention Step
Close the shutoff valves by turning the knobs clockwise. Then open the faucet handles to let out leftover pressure and drain the lines. No shutoff valves under the sink? Turn off the home’s main water supply instead.
Set a shallow pan and some old towels under the sink before you disconnect the lines. Even when the water is off, some water will still come out.
If a line is brittle, corroded, or you have no idea how old it is, replace it during the swap. It’s a small step that can save a big mess. Before you hook up the new faucet, flush the lines into a bucket for 1 to 3 minutes to clear out mineral debris.
When Professional Help Makes Sense
If a shutoff valve won’t turn, stop there. Don’t muscle it. A stuck or rusted valve can damage the pipe behind the wall or under the sink, and that problem gets expensive fast.
If water keeps flowing after the valves are closed, the valves have failed. At that point, a licensed plumber should replace them before you go any further.
With the water supply handled, the next trouble spot is the sealing and mounting hardware.
3. Using Gaskets, Sealant, or Mounting Hardware the Wrong Way
Primary Installation Risk
Once the supply lines are in place, the next spot that tends to fail is the seal around the sink deck.
Don’t put plumber’s putty or silicone on top of a gasket that’s already there.
"Adding sealant where a gasket already exists prevents proper compression and creates uneven pressure points." – Ana Matos, Adaven Plumbing Inc.
That kind of setup throws the seal off. It can leave small gaps, and then people often crank down harder on the faucet to fix it. That’s when the gasket gets crushed, the sink surface gets damaged, or the faucet body takes a hit.
Typical Warning Signs
These leaks don’t always show up right away. In many cases, they appear weeks later, after water has already made its way under the deck.
| Sealing Component | Common Mistake | Resulting Problem |
|---|---|---|
| Rubber Gasket | Overtightening mounting nuts | Gasket crushes or distorts; potential cracks in sink surface or faucet body |
| Plumber’s Putty | Applying over an existing gasket | Prevents proper compression; creates uneven pressure |
| Silicone Sealant | Applying too thick a layer | Faucet won’t sit flush; the seal fails over time |
| Mounting Surface | Old residue on the deck | Gasket won’t seat evenly; water seeps under the sink |
Prevention Step
Start with a clean surface. Scrape away old putty and mineral buildup, then dry the sink holes all the way.
Use plumber’s putty or silicone only if the manual says to use it. Thread the mounting nut by hand first. Then tighten it just enough to keep the faucet steady.
After that, run the faucet and check the base and connections for any moisture. If you see moisture at all, you have a leak.
If the faucet still moves, more sealant won’t fix it. The issue is tightening.
When Professional Help Makes Sense
If the faucet still wobbles after tightening, or the base won’t sit flat, stop there. Pushing harder can crack the sink surface or damage the faucet body. That’s the point where it’s smart to call a plumber.
4. Overtightening or Undertightening Connections and Mounting Nuts
Primary Installation Risk
If the faucet sits flat but still moves, the next thing to check is torque. After the seal is in place, bad tightening becomes the next point where things go wrong. Tighten too much, and parts can crack or warp. Tighten too little, and the faucet stays loose and more likely to leak.
Overtightening is hard to spot because the damage doesn’t always show up right away. Pressure builds at the contact points on thin metal decks and stainless steel sinks, and small cracks or gasket failure may not appear for days or even weeks as the materials settle under that strain.
Typical Warning Signs
| Issue | Overtightening | Undertightening |
|---|---|---|
| Primary Symptom | Delayed leaks; cracked sink deck | Immediate or intermittent dripping; wobbling faucet base |
| Physical Damage | Crushed gaskets, stripped threads, distorted faucet body | Loose hardware and extra stress on supply line hoses |
Prevention Step
Once the faucet is seated, the right amount of tightening keeps the seal in place. Start every connection by hand so you can spot bad alignment before you reach for a wrench. If a nut doesn’t thread on smoothly by hand, stop, back it off, and line it up again.
For supply line nuts, finger-tight plus a small turn is usually enough. For mounting nuts, stop as soon as the faucet no longer shifts.
"Proper installation stops tightening once the faucet is stable and sealed, not when resistance peaks." – Adaven Plumbing Inc.
A basin wrench helps a lot when you’re working in a cramped space under the sink. After tightening, check each fitting before moving ahead. Turn the water on slowly, then wrap a dry paper towel around each fitting. If the towel picks up any moisture, that fitting needs more attention, either a slight tightening or a full reseating.
When Professional Help Makes Sense
Sometimes this stops being a simple DIY fix. If tightening still doesn’t stop movement or seepage, it’s time to pause. The same goes if the faucet still wobbles after tightening, if the nut gets hard to turn before the faucet is secure, or if the sink deck seems fragile.
Call a plumber if the shutoff valves are corroded, the under-sink space is too tight to line up the hardware safely, or a leak keeps going even after the connections feel snug.
sbb-itb-998eb83
5. Skipping Plumber’s Tape or Applying It Incorrectly
Primary Installation Risk
Once the fitting is seated, the threads are what stop water from slipping through. On threaded connections, plumber’s tape helps fill tiny gaps in those threads. If you skip it where it’s needed, you can end up with a slow leak. And those are sneaky. A small drip under the sink can sit there for days, soaking the cabinet floor or even the subfloor before anyone spots it.
That said, tape is only for threaded fittings that need it. Don’t use it on compression joints, gaskets, or O-rings.
If a connection already seals with a rubber gasket or O-ring, adding tape can get in the way. Instead of helping, it can stop the joint from sealing the way it should and cause a leak.
Typical Warning Signs
The table below shows the most common tape-related mistakes and what to do about them:
| Issue | Likely Cause | Fix |
|---|---|---|
| Leak despite tape applied | Tape wrapped counter-clockwise | Remove and re-wrap clockwise |
| Leak on a gasketed joint | Tape interfering with rubber gasket | Remove tape; let the gasket do the work |
| Intermittent leak under sink | Cross-threading or a poor seal | Back out the fitting, hand-align, and restart |
| Moisture on the threads | Under-tightened connection | Tighten it lightly with a wrench, but don’t force it |
Prevention Step
Start by cleaning the threads. Then wrap 2 to 3 layers of tape tightly in a clockwise direction, so it stays put as you tighten the fitting. Begin the connection by hand first. Once the threads catch cleanly, use a wrench to finish tightening.
Once the threaded joints are sealed, the next step is clearing the supply lines before full use.
6. Not Flushing Supply Lines or Checking for Debris Before Use
Primary Installation Risk
Once the fittings are snug, it’s easy to think the job is done. But there’s one more step that helps protect the new faucet: flush the lines before use.
Older plumbing often holds sediment and mineral scale. During installation, that material can break loose and travel into the new fixture. If it gets inside, it may clog the cartridge and cut the faucet’s lifespan short.
Typical Warning Signs
Debris trouble usually shows up right after the water is turned back on. Common signs include:
- Low or uneven water pressure
- Sputtering
- Stray spray
- Dripping
- Grit in the aerator
Prevention Step
Use this sequence. First, flush the open supply lines into a bucket for 5 to 15 minutes before connecting the faucet. Then install the faucet, unscrew the aerator, and run both hot and cold water for 1 to 5 minutes each to clear dust or debris from the install.
Once the water runs clear, check the aerator for trapped particles before screwing it back on. Then wipe each connection with a dry paper towel. If you see any moisture, there’s a leak that needs attention.
If flushing doesn’t fix the issue, the next step is to check the local water setup and decide whether it’s time to call a pro.
7. Overlooking Local Plumbing Conditions and Waiting Too Long to Call a Pro
Primary Installation Risk
A faucet swap can look simple right up until your old plumbing pushes back.
Even if the new faucet fits the sink and the connections seem tight, the plumbing underneath may be the weak point. Corroded pipes, hard-water scale, and brittle fittings can turn a basic install into a leak the moment you start moving parts around.
The bigger issue is what happens if that leak goes unnoticed. A slow drip under the sink can soak particle board cabinets and damage flooring or drywall before you spot it.
Typical Warning Signs
Some signs mean you should stop and take a closer look before going any further.
Visible mineral buildup around old fittings, stiff or cracked supply hoses, and odd water pressure can all point to plumbing issues that need attention first.
"If you notice old or rusted valves that won’t close properly, it’s best not to force them." – Shivangi Thakor, Order a Plumber
Prevention Step
Before you loosen anything, check the pipe condition, water pressure, and any mineral buildup. It’s also smart to replace old supply lines as a standard step.
If you live in a hard-water area, go with solid brass or stainless steel fixtures. They tend to hold up better against mineral buildup than plastic or cheap metal parts.
And if the plumbing still looks iffy, stop before you reconnect the faucet.
When Professional Help Makes Sense
Some jobs just stop being a basic DIY swap.
If your shutoff valves are frozen or corroded, have a plumber replace them before the new faucet goes in, not after. The same goes for jobs that involve changing sink hole layouts, adding a water filtration system, or working on thin stone or porcelain countertops that can crack if you overtighten parts.
If the valves are stuck, the pipes seem fragile, or you’re adding a filtration unit, call ALL Plumbing Services in Charleston or Bluffton before you finish the install.
Use the fit and tightening tables below to check whether the install is still safe to finish.
Faucet Fit and Tightening Reference Tables
If the faucet still fits the sink and the plumbing looks solid, use these tables as a final check before you wrap up.
Faucet Configuration Comparison Table
Use this table to line up hole count, spread, and clearance fast. Start here, then review tightening before you turn the water back on.
| Faucet Type | Required Sink Holes | Clearance Needs | Advantages | Common Problems |
|---|---|---|---|---|
| Single-Handle Pull-Down | 1 (or 3 with deck plate) | High vertical clearance; room under the sink for the hose and counterweight | Easy one-handed operation; integrated sprayer | Hose snagging on supply lines; counterweight clearance |
| Two-Handle Widespread | 3 (typically 8" spread) | Wider horizontal deck space | Precise temperature control; classic look | More connection points under the sink; precise alignment |
| Bridge | 2 or 3 | Backsplash clearance for handles; specific hole spacing | Distinctive vintage aesthetic; easy to clean under the bridge | Requires exact hole spacing; harder to install than centerset |
| Wall-Mounted | 0 (mounted to wall) | Spout reach must align with the sink basin | Clears up counter space; easy to clean the sink deck | Requires exact in-wall plumbing alignment |
Most kitchen sinks use an 8-inch spread. If you’re installing on a thick stone countertop, check that the faucet’s mounting shank is long enough.
Connection Tightening Reference Table
Tightness is one of those steps that seems simple, but it’s easy to overdo. A good rule of thumb for supply lines is hand-tight, then a quarter-turn with a wrench – no more.
| Tightening Level | Symptoms | Risks | Corrective Action |
|---|---|---|---|
| Overtightened | Resistance peaks; visible gasket deformation; cracked sink deck | Crushed gaskets; stripped threads; hairline fractures in porcelain or stone | Loosen and replace damaged gaskets; stop tightening if cracks appear |
| Correctly Tightened | Faucet is stable and doesn’t move; connections are dry to the touch | Long-term durability; leak-free performance | Quick towel check |
| Undertightened | Faucet wobbles; immediate dripping or slow seepage from connections | Water damage to cabinetry; mold growth; stress on supply lines | Snug the connection by a 1/16th turn at a time until the drip stops |
When a DIY Faucet Installation Becomes a Plumbing Job
Signs the Job Is No Longer a Simple Faucet Swap
Some faucet swaps are easy. Others turn into a mess the second you look under the sink.
If the new faucet fits, but the plumbing below it won’t cooperate, you’re no longer doing a basic swap. At that point, you’re dealing with repair work.
Stop the job if shutoff valves won’t close, fittings are corroded, the sink deck has cracks that showed up before tightening, or a leak keeps going even after correct retightening. The same goes for older pipe materials that don’t connect cleanly to new fittings. That’s a clear sign the project has moved past a simple fixture change.
Code, Safety, and Water Filtration Add-Ons
Even if you picked the right faucet, the install can stop being simple once it calls for plumbing changes instead of just replacing hardware.
A layout change can do that fast. For example, moving from a three-hole faucet to a one-hole setup may call for a deck plate or countertop work, which is more than a standard swap. In some Charleston historic districts or multi-family buildings, those changes may also need permits and code compliance.
Add-ons can make things trickier too, especially when they change the supply setup. That includes:
- An under-sink water filtration system
- A touchless faucet
- A secondary sprayer line
When to Call a Local Plumber
If any of these problems show up, stop the DIY install before a small issue turns into water damage.
Homeowners in Charleston and Bluffton also deal with high mineral buildup and salt-air corrosion. Because of that, solid brass or stainless steel fixtures usually last longer. Call ALL Plumbing Services for fixture work, leak detection and repair, or water filtration installs in Charleston and Bluffton.
Conclusion
Most faucet problems come back to the same four issues: bad fit, weak seals, loose connections, and skipping the final test.
The fix isn’t complicated. Just slow down before you wrap up. Wipe every connection dry, run both hot and cold water, and then check for leaks. That last step matters more than people think. Small leaks can stay hidden for a while, and even a tiny drip can damage cabinets and flooring before you spot it.
If the installation still doesn’t feel stable, stop. The same goes if shutoff valves are leaking, pipes look corroded, or the area under the sink is hard to make sense of. That’s the point where it makes sense to call a plumber.
For tricky faucet installs in Charleston or Bluffton, ALL Plumbing Services offers fixture services, leak detection and repair, and water filtration systems.
FAQs
How do I know if a new kitchen faucet will fit my sink?
Check your sink or countertop’s mounting hole configuration before you buy anything. Count the holes you already have, measure the space between them, and make sure the faucet lines up with that setup.
It also helps to check the countertop thickness. Some surfaces are thicker than expected, which means you may need longer mounting hardware to get a proper fit.
If your new faucet doesn’t use every hole, that’s usually an easy fix. An escutcheon or deck plate can cover the extra openings and keep the install looking clean.
Should I replace old supply lines during a faucet install?
Yes. Old water supply lines should be replaced when installing a new faucet.
Even if they look fine, those lines can wear down over time under constant pressure and turn brittle. Then installation day comes, you move them a bit, and that small shift is enough to start a leak.
That’s why new braided stainless steel lines are a smart, low-cost swap. They help cut the chance of failure later, and choosing the right length keeps extra strain off the connections.
When should I stop and call a plumber?
Consider calling a professional if you’re installing a wall-mounted faucet, if you’re unsure about any step, or if you run into issues that won’t go away.
ALL Plumbing Services can help with major leaks, fixture installation, and repair in Charleston, SC, and nearby areas. Hiring a pro can also help protect your plumbing connections, cabinetry, and countertops from water damage.