

One dripping faucet can waste more than 3,000 gallons of water a year. If I want to fix it myself, I first need to find where the leak starts, then match it to the faucet type and the part that usually fails.
Here’s the short version: this guide walks me through the full DIY process for compression, cartridge, ball, and ceramic disk faucets. It shows how to shut off water, protect the sink, gather tools, spot the leak location, and decide whether I need a washer, O-ring, cartridge, valve-seat cleanup, or supply line fix. It also points out when I should stop and call a plumber, like with rust, cracked parts, repeat leaks, seized shut-off valves, or cabinet water damage.
What I get in this checklist:
- How to shut off the water and prep the work area
- What tools and parts to have ready
- How to tell compression vs. cartridge vs. ball vs. ceramic disk
- How to match a leak at the spout, handle, base, or under-sink connection
- What part to check first for each leak
- How to test the repair after I put the faucet back together
- When a DIY fix is not the right move
Quick Comparison
| Faucet type | How I can spot it | Leak spots I should check first | Part I’ll likely replace |
|---|---|---|---|
| Compression | Two handles; takes several turns to close | Spout, handle | Washer or O-ring |
| Cartridge | One or two handles; smooth quarter-turn or lift/turn | Spout, handle base | Cartridge or O-rings |
| Ball | Single handle; domed cap; moves in many directions | Spout, dome/handle area | Seats, springs, O-rings |
| Ceramic disk | Single lever; short smooth motion; wide body | Spout, base | Disk cartridge or inlet seals |
If I start with the leak location and faucet style, I have a much better shot at buying the right part the first time and fixing the drip without extra guesswork.
Pre-Repair Checklist: Shut Off Water, Protect the Sink, and Gather Tools
Shut off the water before you take anything apart. Look under the sink for the hot- and cold-water shutoff valves. Turn both clockwise to close them, then open the faucet to relieve pressure and drain the lines. If a valve sticks, stop there and shut off the main water supply.
After the water is off, plug the drain with a rag or the sink stopper. Tiny parts have a bad habit of slipping right into the drain. It also helps to lay an old towel in the sink basin so dropped parts don’t bounce around or scratch the finish.
Tools and Parts to Have Ready
Get everything together before disassembly. It saves time and cuts down on back-and-forth trips once the faucet is in pieces.
| Tool or Part | What It’s For |
|---|---|
| Adjustable wrench | Loosening packing nuts and supply lines |
| Phillips and flathead screwdrivers | Removing handle caps and internal screws |
| Allen wrench set | Hex screws on modern handles (3/32" and 1/8" cover most) |
| Needle-nose pliers | Pulling retaining clips and small cartridges |
| Flashlight | Seeing inside dark sink cabinets |
| Small parts tray | Keeping screws and clips in order |
| PTFE tape | Sealing threaded metal connections |
| Silicone plumber’s grease | Lubricating new O-rings and seals |
| Replacement washers and O-rings | Assorted packs for common faucet repairs |
| Brand-matched cartridge | For the faucet brand and model |
Use silicone plumber’s grease only on rubber parts. Petroleum jelly and WD-40 can damage them.
A small trick: wrap the jaws of your wrench with masking tape to help avoid scratches.
Before Disassembly
Before disassembly, feel both supply lines under the sink. The warm line marks the hot side, and the cold line marks the cold side.
Then grab your phone and take photos as you go. Handle cap off? Take a photo. Screw out? Take a photo. Cartridge lifted? Take a photo. Those shots make reassembly much easier and help you check the order of parts later.
Next, identify the faucet type and leak location before disassembly.
sbb-itb-998eb83
Diagnosis Checklist: Identify the Faucet Type and Leak Location
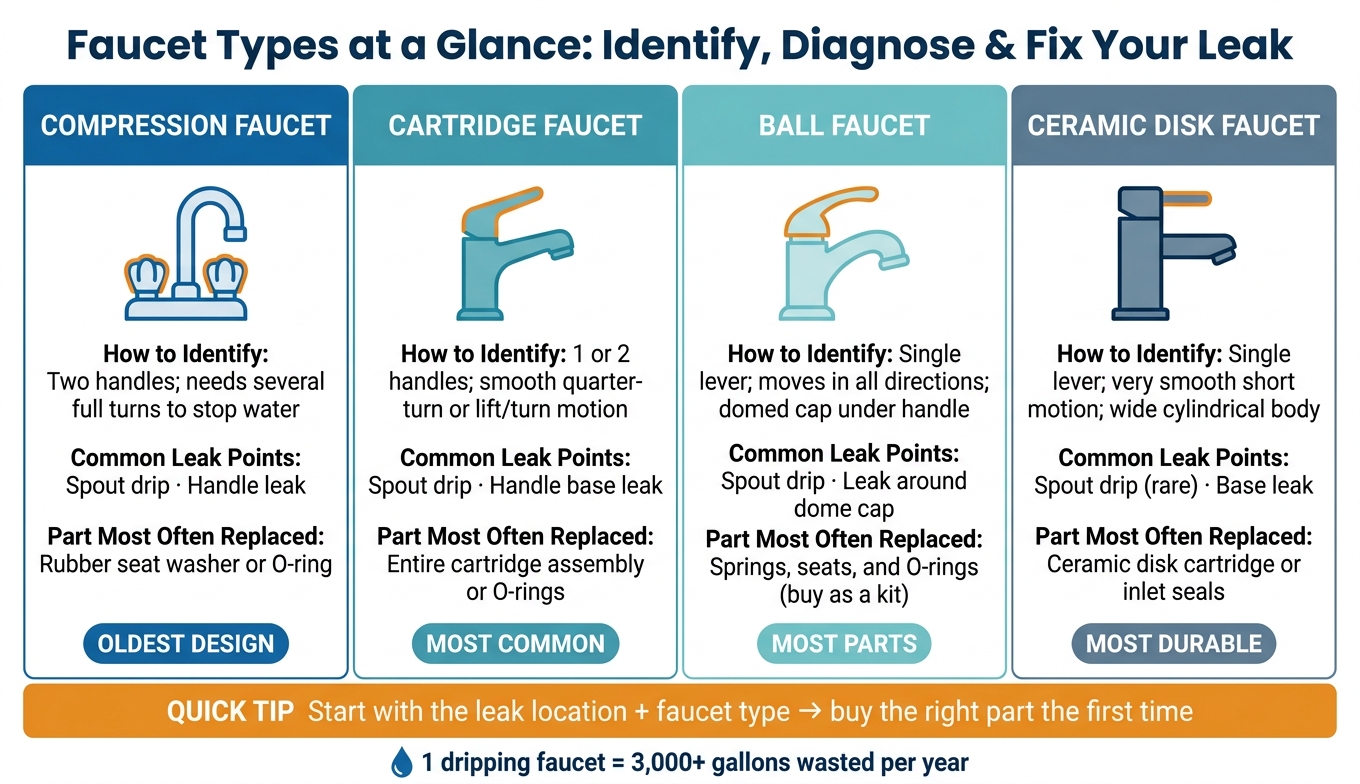
Faucet Types at a Glance: Identify, Diagnose & Fix Your Leak
With the water shut off, figure out the faucet style and where the leak is coming from before you take anything apart. That one step can save time, cut down on guesswork, and help you buy the right part the first time.
How to Identify Compression, Cartridge, Ball, and Ceramic Disk Faucets
Start with the handles and how they move. A faucet with two handles that needs several full turns to stop the water is usually a compression faucet. If a two-handle faucet shuts off with a smooth quarter-turn, you’re likely looking at a cartridge faucet.
For single-handle models, the body shape tells you a lot. A ball faucet usually has a domed cap under the handle. A ceramic disk faucet often has a wide cylindrical body with a short lever mounted on the side.
| Faucet Type | How to Identify It | Common Leak Points | Part Most Often Replaced |
|---|---|---|---|
| Compression | Two handles; multiple rotations to close | Spout drip; handle leak | Rubber seat washer or O-ring |
| Cartridge | 1 or 2 handles; smooth quarter-turn or lift/turn motion | Spout drip; handle base leak | Entire cartridge assembly or O-rings |
| Ball | Single lever; moves in all directions; domed cap under handle | Spout drip; leak around dome cap | Springs, seats, and O-rings (kit) |
| Ceramic Disk | Single lever; very smooth, short action; wide cylindrical body | Spout drip (rare); base leak | Ceramic disk cartridge or inlet seals |
Before you buy parts, look for the brand logo on the faucet body, handle, or cap. That small detail can make it much easier to match the right cartridge or repair kit and avoid an extra trip to the store.
Once you know the faucet type, match the leak spot to the most likely cause.
Match the Leak Location to the Likely Cause
After you identify the faucet, find the exact point where water is escaping. In most cases, the leak location narrows the problem to one or two parts.
| Leak Location | Likely Cause | Part to Inspect or Replace |
|---|---|---|
| Spout drip | Worn internal seal or damaged valve mechanism | Washer, cartridge, or seats and springs |
| Handle base | Failed stem O-ring or loose packing nut | O-rings or packing nut |
| Faucet base | Worn spout O-rings or failed deck gasket | Spout O-rings or deck gasket/caulk |
| Under-sink | Loose supply line connections or failing shut-off valve | Supply line nuts, washers, or angle-stop valve |
If the drip keeps going after you replace the usual part, inspect the valve seat for pitting. If the drip still persists after that, move to the symptom checklist below.
Repair Checklists: Fix the Leak by Symptom
Use the checklist that matches the leak location and faucet type. Start with the symptom you can see, then follow the matching checklist below.
Spout Drip Checklist
A dripping spout usually points to a worn seal inside the faucet. The exact repair depends on the faucet type.
- Remove the handle
Pry off the decorative cap, remove the handle screw, and pull the handle straight off. On some single-handle faucets, there’s a small setscrew on the side or back. Look for a 3/32" or 1/8" hex opening.
- Extract the stem or cartridge
Unscrew the packing nut or remove the retaining clip, then pull out the stem or cartridge. Keep the parts in order so reassembly is easier.
- Replace the worn part
- Compression faucet: Replace the rubber washer at the bottom of the stem and the stem O-ring if needed.
- Cartridge faucet: Replace the whole cartridge. Bring the old one with you so you can match it exactly.
- Ball faucet: Replace the springs, rubber seats, and O-rings as a set.
- Ceramic disk faucet: Replace the cartridge. Soak the cartridge in a 50/50 vinegar-water mix for 30 minutes to loosen scale.
- Clean the valve seat
Use an old toothbrush and white vinegar to scrub off mineral scale from the valve seat and inside the faucet body. If the metal seat feels rough or pitted, it may need resurfacing or replacement.
- Lubricate and reassemble
Apply NSF-61-rated silicone plumber’s grease to the new O-rings and seals before putting them back in. Reassemble in reverse order, and make sure the cartridge lines up with its notch.
Handle or Base Leak Checklist
Handle seepage usually points to an O-ring or packing nut. Water pooling at the base usually points to spout O-rings or loose mounting hardware.
- Handle leak: Tighten the packing nut a quarter-turn clockwise with an adjustable wrench. If it still leaks, replace the stem O-ring.
- Base leak: Remove the spout, slide off the old O-rings, clean away mineral buildup with white vinegar, coat the new O-rings with silicone grease, and reinstall. If the faucet body wobbles, tighten the mounting nuts under the sink.
If the leak is under the sink, move to the next checklist.
Under-Sink Connection Leak Checklist
Leaks below the sink usually come from the supply line, shut-off valve, or faucet shank.
Dry each connection, press a paper towel against each one, and run the water. The wet towel will show you the source.
Once you find it, go step by step:
- Loose compression nut: Tighten it with an adjustable wrench – snug, then add a quarter-turn.
- Threaded metal connection: Wrap the threads with PTFE plumber’s tape before reconnecting. Don’t use tape on compression fittings that rely on rubber gaskets.
- Damaged supply line: If a braided stainless steel line is kinked, corroded, or bulging, replace it.
If a shut-off valve is seized, stop and shut off the main water supply.
Final Check and When to Call a Plumber
Post-Repair Testing and Basic Maintenance
Once you’ve put everything back together, test the faucet before you close the cabinet. Open the supply valves slowly, run both hot and cold water for 1 minute, and check for leaks around the spout, handle, base, and supply lines.
Next, dry every surface with a clean towel. Then use a flashlight to look under the sink and inspect the supply line connections and shut-off valves. A dry surface makes it much easier to spot even a small drip.
It also helps to remove the aerator, soak it in white vinegar, rinse it, and reinstall it. Repair work can shake loose debris or scale, which may clog the screen and cut water flow. After a few hours of normal use, check the faucet again. Some minor leaks don’t show up right away and only appear after steady pressure builds.
Exercise the shut-off valves once a year so they don’t seize when you need them most.
Call ALL Plumbing Services for Recurring or Complex Leaks

If the leak comes back after the standard repairs, stop there. When a faucet still drips after replacing washers, O-rings, seals, or a cartridge, the issue may be the valve seat, internal corrosion, or high water pressure.
Rust, a cracked faucet body, water damage inside the cabinet, or a seized shut-off valve are also clear signs that it’s time to bring in a plumber. At that point, call ALL Plumbing Services for leak detection and repair throughout Charleston, SC, and Bluffton, SC.
FAQs
How do I know which faucet type I have?
Start with the handle design. Compression faucets have two handles and usually take several turns to shut the water off. Single-handle faucets are often ball, cartridge, or ceramic disc models.
Ball faucets move in different directions over a rounded joint. Cartridge and ceramic disc faucets usually use a smooth lever, and ceramic disc models often have a squared-off base. If you still aren’t sure, take off the handle and check the inner parts or look for the brand logo.
What if my faucet still leaks after I replace the part?
If your faucet still leaks after you replace a part, a few usual problems may be causing it:
- A corroded or pitted valve seat
- An over-tightened packing nut
- The wrong size part, or a part that isn’t sitting in place the right way
- A cracked internal housing
If the leak keeps going, ALL Plumbing Services can help with fixture repair.
When should I call a plumber?
Call a plumber if the leak is under the sink, you can’t find or use the local shut-off valves, or you’re dealing with a high-end bridge faucet or a more complex shower mixing valve.
It also makes sense to bring in a pro if the drip keeps going after you replace the seals, the valve seat is corroded and needs resurfacing, or you’re not comfortable handling any part of the repair. ALL Plumbing Services can help with these issues.
